You've seen the posts: someone drops a folder of raw clips into Claude, types one sentence, and gets a finished vertical video back. It's real. But it doesn't work the way most people picture it.
Claude never watches your footage. It can't. It reads a transcript, looks at a few still frames, and writes ffmpeg commands.
Get that right and a Claude edit saves you an afternoon. Get it wrong and your captions end up hiding behind Instagram's like button. One of the most popular editing skills does exactly that by default. We'll show you the frame.
Plans, docs, repo stats and Instagram's specs checked on 13 October 2026. We ran the editing pipeline below on a real clip in a terminal; we did not have Claude Code drive it.
What you'll have at the end, and what Claude actually does
By the end you'll be able to say "cut the dead air, make it vertical, add captions" and get back a 1080×1920 MP4 that fits Instagram's rules. You'll also have a skill file and prompts to reuse on every Reel.
Here's the part the demos skip. Claude's vision input takes JPEG, PNG, GIF and WebP images. For an animated GIF it sees only the first frame (Anthropic's vision docs). There's no video input, so every Claude video setup does the same three things:
- A speech-to-text model (usually a Whisper variant) turns your audio into a transcript with a timestamp on every word.
- Claude reads that transcript, and a few frames or a contact sheet when it needs to see something, then decides what to keep.
- Claude writes and runs ffmpeg commands that make the actual cuts, crops and captions.
The authors of video-use, the most-starred Claude editing skill, put it bluntly: "The LLM never watches the video. It reads it." Sending every frame of a long edit, they calculate, would be "45M tokens of noise". Their method uses about 12 KB of text and a few images.
That has a practical upside. Talking-head Reels, tutorials and podcast clips edit beautifully, because the transcript is the edit. Pure visual montages with no speech are much harder, because Claude has nothing to read.
What you need before you start
Three things: a Claude plan that can run commands on your computer, ffmpeg, and a transcription engine.
The plan matters more than people expect. Claude's Free plan includes Skills and desktop extensions, but not Claude Code. Pro includes it, at $20 a month or $17 a month billed yearly (claude.com/pricing). Max starts at $100 a month for 5x or 20x Pro's usage.
Claude Code shares one usage pool with your chats. A long editing session eats into the same limit.
| Setup | Plan | Good for | The catch |
|---|---|---|---|
| Claude Code + a skill | Pro or higher | Cutting your own footage with ffmpeg | Runs in a terminal |
| Claude Desktop + an MCP server | Any (desktop extensions are on Free) | Driving an editor like DaVinci Resolve or Premiere | Each server needs its own install |
| Claude Motion (beta) | Team or Enterprise only | Animated explainers built from text, charts and images | Doesn't edit camera footage |
That last row trips people up. Claude Motion exports MP4s, but Anthropic's help page says it "doesn't use a video generation model, so it doesn't create realistic footage or people". It's for animated charts and walkthroughs, not for trimming your vlog.
For everything below we'll assume Claude Code. Install it with curl -fsSL https://claude.ai/install.sh | bash, or brew install --cask claude-code on a Mac. Then install ffmpeg (brew install ffmpeg or sudo apt install ffmpeg).
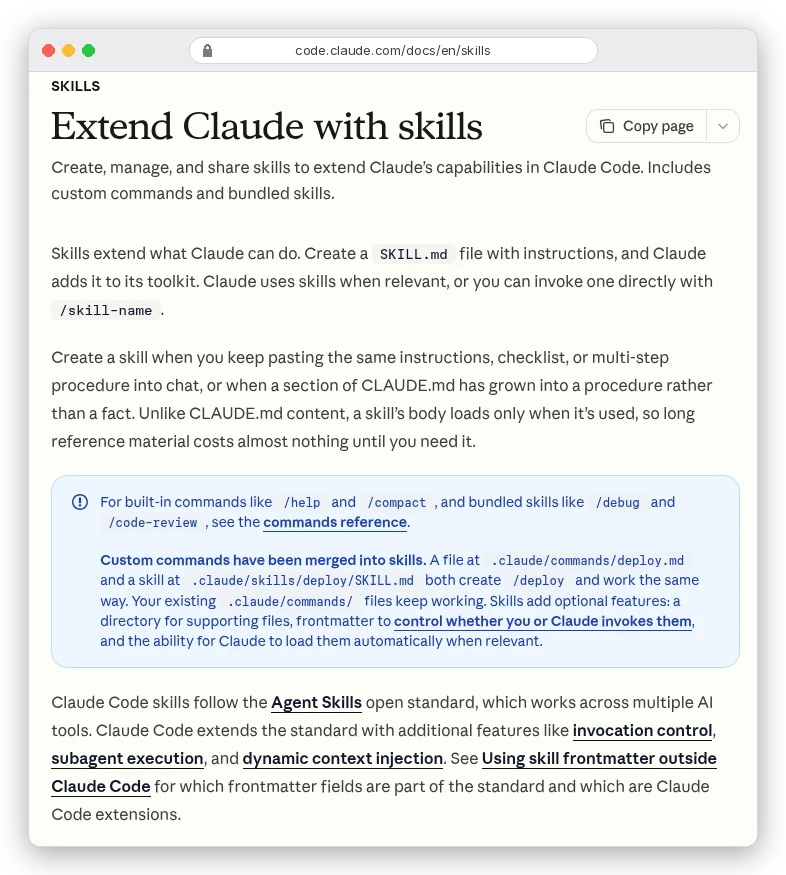
The SKILL.md holds a short description that tells Claude when to use it, then instructions and any scripts. Put the folder in ~/.claude/skills/ for all projects or .claude/skills/ for one. Claude loads it when your request matches, or you call it with /skill-name.
So which skills are worth installing?
The video skills and MCP servers worth installing
We opened every repo below, read its README and install steps, and pulled its stars from GitHub on 13 October 2026. We dropped several "Claude video editor" repos with almost no stars. Popularity is the cheapest sign that someone else has hit the bugs first.
| Repo | What it's for | Stars | Licence |
|---|---|---|---|
| browser-use/video-use | Talking heads: cuts filler words and dead air, captions, grades | 28.8k | MIT |
| kajisho5/ffmpeg-skill | Local ffmpeg toolbox: 42 scripts, no API keys | 1.9k | MIT |
| WyattBlue/auto-editor | Silence cutting, plus timelines for Premiere and Resolve | 5.5k | Public domain |
| remotion-dev/skills | Title cards, animated captions, motion graphics in code | 5.1k | Remotion licence |
| samuelgursky/davinci-resolve-mcp | Lets Claude drive DaVinci Resolve Studio | 3.5k | MIT |
| hetpatel-11/Adobe_Premiere_Pro_MCP | Lets Claude drive Premiere Pro through a panel | 679 | MIT |
video-use: the one built for talking heads
video-use is the closest thing to "drop footage, get a Reel". It removes ums and false starts and adds 30 ms audio fades so cuts don't pop. It burns in two-word uppercase captions, then checks its own render at every cut before showing you.
It also proposes a plan and waits for your OK before touching anything. That's the behaviour you want.
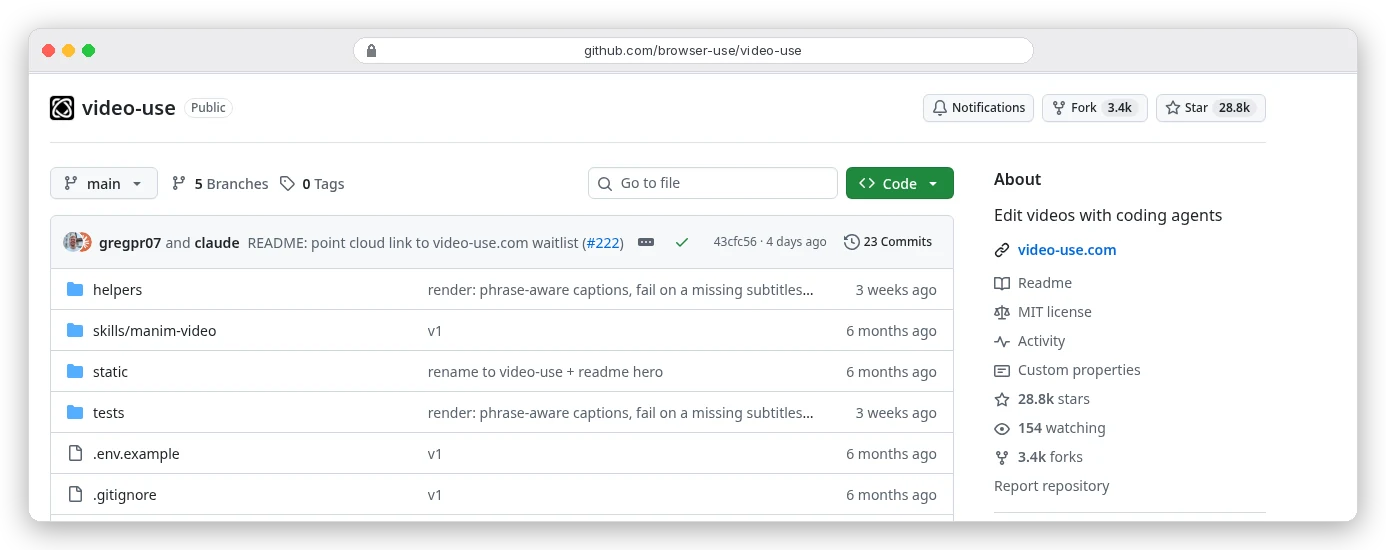
The catch is transcription. video-use sends each source file to ElevenLabs' Scribe model, so you need an ElevenLabs API key and your audio leaves your machine. To install, clone the repo, link it into ~/.claude/skills/video-use and run uv sync. Or paste the setup prompt from its README into Claude Code.
ffmpeg-skill: the local one, and the one we ran
ffmpeg-skill is the opposite trade. Everything runs on your machine with plain ffmpeg and Python's standard library, and transcription is optional and local. Install it with npx ffmpeg-skill (it lands in ~/.claude/skills/ffmpeg-skill) or claude plugin install kajisho5/ffmpeg-skill.
We installed version 2.8.6 and ran its silence, reframe, caption, export and check scripts on our test clip by hand. They worked, and its silence cutter found the same six pauses ours did.
But its Instagram preset has two settings to change before you trust it. They're why this guide has a whole section on caption placement.
auto-editor, Remotion, and the Resolve and Premiere bridges
auto-editor is a public-domain silence cutter. It also exports timelines for Premiere, Resolve, Final Cut, Shotcut and Kdenlive, so you can rough-cut with Claude and finish by hand. It has its own skill (npx skills add WyattBlue/auto-editor). Install the tool from its GitHub releases or with Homebrew; the pip package is no longer published.
Remotion's official skills (npx skills add remotion-dev/skills) make video from React code: animated titles, captions, progress bars. Use them for the hook card at the start of a Reel, not to cut footage. Remotion is free for individuals and companies of up to three people; bigger companies need a licence.
If you already edit in a real editor, the MCP servers are more interesting than any skill. The Resolve server needs the paid Studio edition: its README says Resolve 21.1 moved Python scripting to Studio. The Premiere server works through a panel you install inside Premiere.
Anthropic's own skills repo has no video skill. Its skill-creator skill is still worth installing, because it helps Claude write the Reels skill you'll copy further down.
For transcription, the main options are free and open source. We used faster-whisper. OpenAI's original Whisper and whisper.cpp do the same job, and WhisperX can tell two speakers apart.
That's the toolbox. Now here's what those tools do to a real clip, step by step.
Step by step: from a raw clip to a Reel
We built a 27-second test clip. The picture is NASA's public-domain footage of Earth from the space station, 1280×720 and horizontal. Over it we laid a synthetic voiceover full of long pauses. Then we ran the commands these skills run, in order, and the whole pipeline took about 30 seconds on a cloud CPU.
We didn't run Claude here. Claude Code isn't installed on the machine we used, so we ran the same commands a skill gives Claude, ourselves. What follows is what Claude would do on your machine, with real output at each step.
1. Probe the file
Every good skill starts by asking ffmpeg what it's working with: length, resolution, frame rate, audio.
ffprobe -v error -show_entries format=duration:stream=codec_name,width,height,r_frame_rate -of json raw.mp4Ours came back 1280×720, 30 fps, 27.0 seconds. Keep that 720 in mind.
2. Cut the silences
ffmpeg -i raw.mp4 -af silencedetect=noise=-35dB:d=0.6 -f null -That finds every stretch quieter than -35 dB lasting 0.6 seconds or more. The skill keeps 0.15 seconds of air either side so words don't get clipped, and joins the rest.
Our clip went from 27.0 to 18.2 seconds. A third of it was dead air. ffmpeg-skill's silence.py uses the same defaults, found the same six pauses and landed on 17.9 seconds.
For a talking-head Reel that's the single biggest win, and it's the step Claude is least likely to get wrong.
3. Reframe to 9:16
ffmpeg -i cut.mp4 -vf "crop=ih*9/16:ih,scale=1080:1920:flags=lanczos,setsar=1" vertical.mp4This takes a vertical slice from the middle of the frame and scales it to 1080×1920. Instagram accepts anything from 1.91:1 to 9:16, with a 720-pixel minimum and at least 30 fps (Instagram Help). But 9:16 is the only shape that fills the screen.
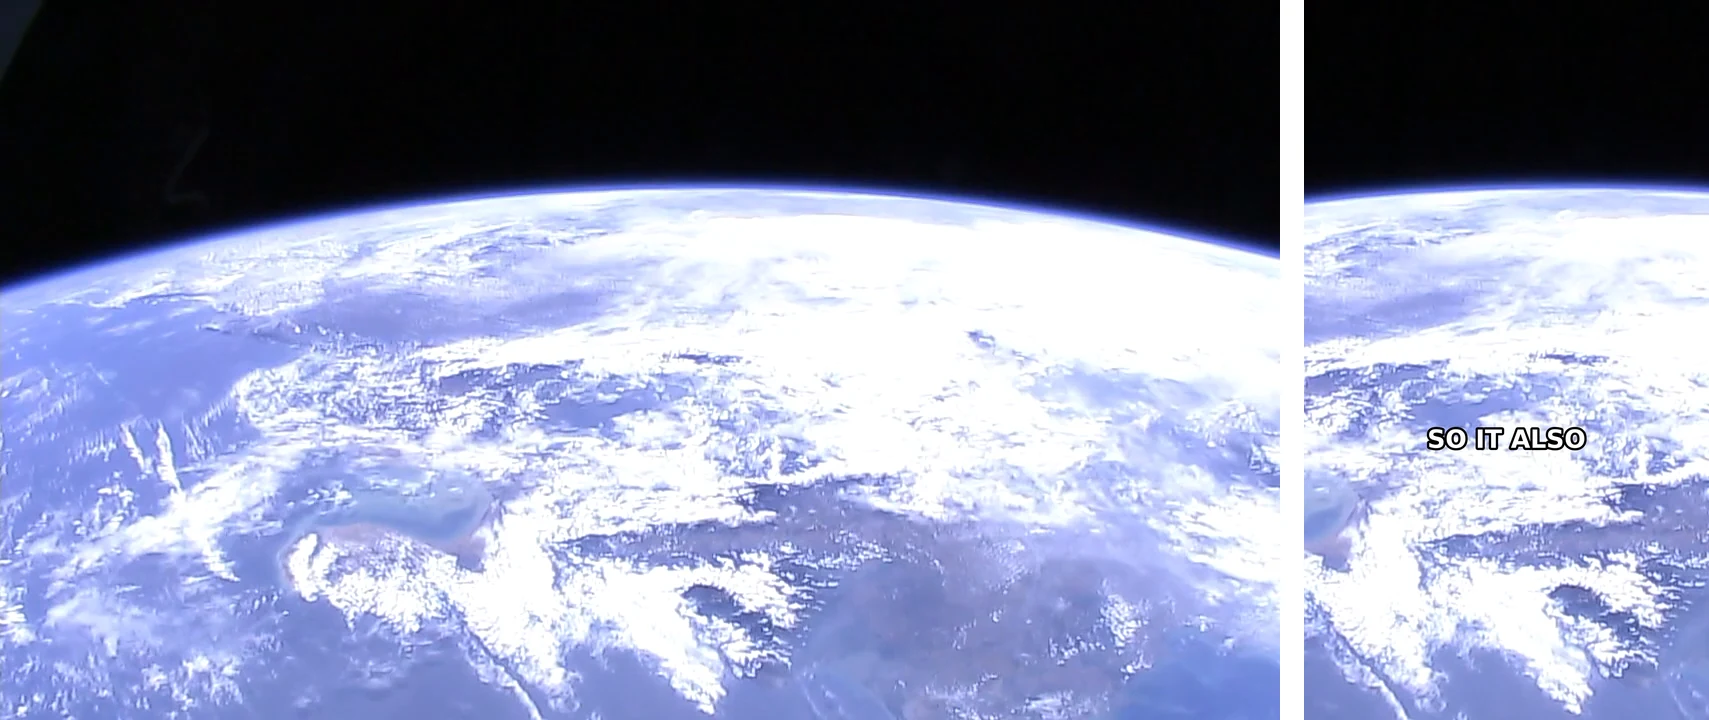
Look at how much is gone. Of a 1,280-pixel-wide frame, the 9:16 slice keeps 405 pixels, under a third. Then that sliver gets stretched 2.67 times to reach 1080 wide, so 720p footage comes out soft.
Film in 4K or vertical if you can. And tell Claude where your subject is ("I'm on the left third") instead of trusting a centre crop.
4. Transcribe with word timestamps
from faster_whisper import WhisperModel
model = WhisperModel("small.en", device="cpu", compute_type="int8")
segments, info = model.transcribe("vertical.wav", word_timestamps=True)
On our 18-second cut, faster-whisper's small English model took about 4.5 seconds on the CPU. It transcribed all 68 words with one slip: the voice said "nine by sixteen" and the transcript said "9x16".
Harmless here. But that's exactly what ends up burned into a caption, so read the transcript before the captions go on.
One install trap: our first run died with open() got an unexpected keyword argument 'metadata_errors'. That's faster-whisper 1.2.1 clashing with the newest PyAV. Running pip install "av<16" fixed it.
5. Build the captions, and break them at sentence ends
Short, chunky captions read best on a phone. Our first pass grouped every three words and gave us "CROP. AND THE", a caption straddling two sentences. Breaking each chunk at punctuation fixed it (23 caption cards became 27).
Then there's where the captions sit, which deserves its own section.
6. Export the way Instagram expects
ffmpeg -i vertical.mp4 -vf "ass=captions.ass" -r 30 -c:v libx264 -profile:v high -crf 20 \
  -pix_fmt yuv420p -c:a aac -b:a 160k -ar 48000 -movflags +faststart reel.mp4
H.264, 30 fps, AAC audio, and +faststart so the video starts playing before it's fully downloaded. Our final file was 1080×1920 and 18.2 seconds long.
7. Make Claude look at the result
Since Claude can't watch the video, make it look at pictures of it. One command turns the Reel into a contact sheet of frames:
ffmpeg -i reel.mp4 -vf "fps=1/2,scale=270:-1,tile=5x2" -frames:v 1 contact-sheet.pngClaude reads the PNG, spots a caption over a face or a cut on a blink, and fixes it before you press play. Our contact sheet is how we caught "CROP. AND THE".
Most homemade setups leave this step out.
The caption trap: where Instagram's buttons sit
Meta doesn't publish a safe zone for ordinary Reels. It does for Reels ads (Meta Ads Guide): keep "at least 14% of the top, 35% of the bottom, and 6% on each side" free of text and logos.
The bottom band is where the post caption, audio line and buttons sit. It's the only figure Meta gives, so it's the one to design to.
On a 1080×1920 frame that means your captions must end above pixel row 1,248, and nothing important should sit in the top 269 pixels.
Now compare ffmpeg-skill's Instagram preset. With --platform reels, it sets the caption margin to 20% of the frame height. Its preset file lists a 20% bottom zone and an 8% top zone. We ran it on the same clip and drew Meta's zones over the same moment in each version:
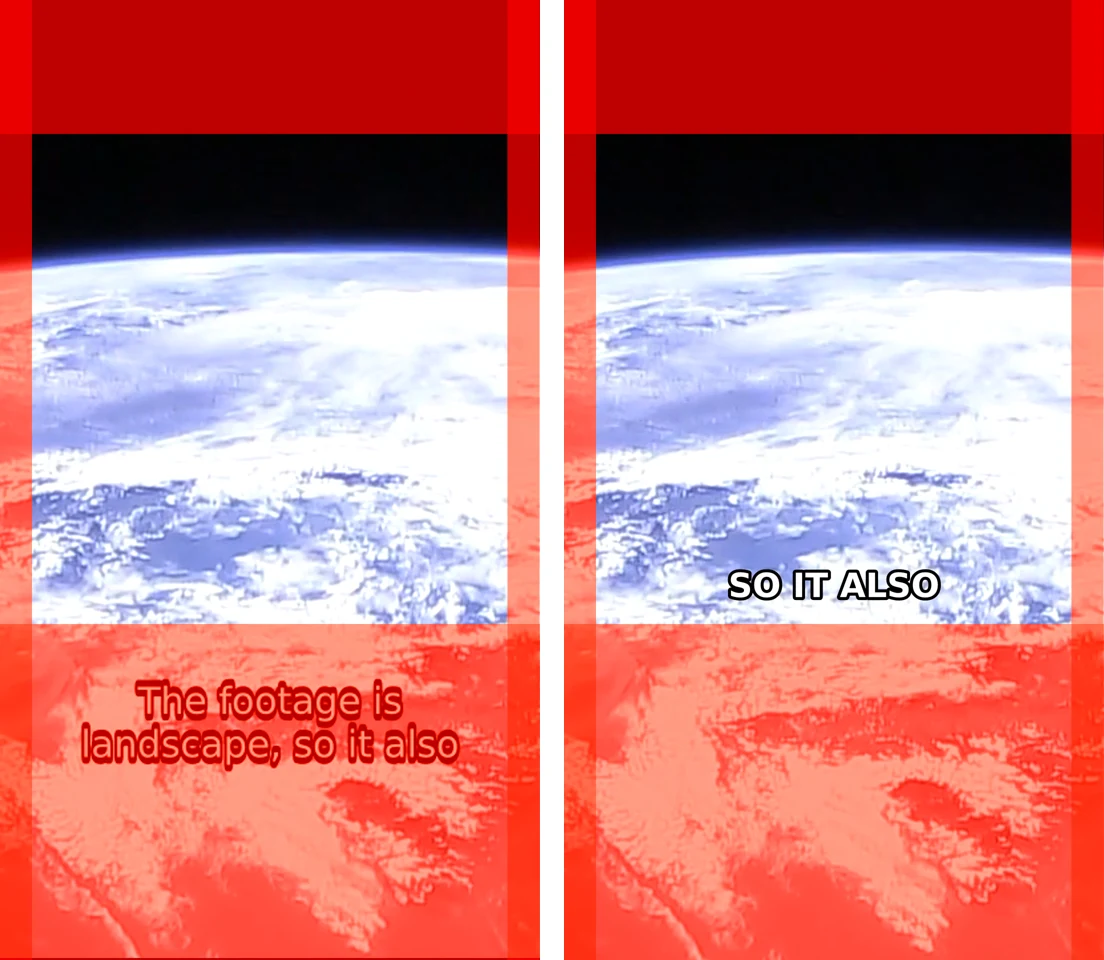
--platform reels. Right: our captions at MarginV 710. Our own run, 13 October 2026.Theirs lands in the red, right where the post caption and buttons go. Ours sits just above it.
That's not an ffmpeg bug, and the rest of the skill is careful work. It's one plausible number that doesn't match Meta's. Nobody checks it until a viewer can't read the punchline.
The same preset caps Reels at 90 seconds, and its export script trims anything longer unless you add --allow-long. It does print a warning, but it's easy to miss in a long agent session.
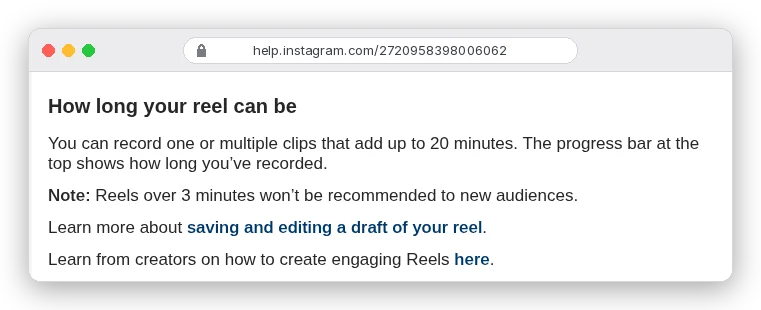
Instagram allows Reels up to 20 minutes, but says Reels over 3 minutes "won't be recommended to new audiences". So the real limit is 3 minutes if you want reach, not 90 seconds.
Two more caption details only show up when you render. First, if your skill positions SRT captions with ffmpeg's force_style, the margin isn't in pixels. libass scales SRT styling to a 288-pixel-tall canvas. MarginV=710 pushed our test caption right off the frame, while MarginV=70 put it about 30% up.
Write an ASS file with PlayResX: 1080 and PlayResY: 1920 instead, and the numbers mean real pixels.
Second, ffmpeg-skill shrank its font from the requested 24 to 13 to fit a 406-pixel-wide frame. Check caption size on a phone, not your monitor.
A Reels-editor SKILL.md you can copy
Here's a skill that bakes in everything above. Save it as ~/.claude/skills/reels-editor/SKILL.md. Claude picks it up the next time you mention a Reel, or you can run it with /reels-editor.
---
name: reels-editor
description: Edit raw talking-head, tutorial or screen footage into an Instagram Reel.
  Cuts silences and filler, reframes to 9:16 at 1080x1920, burns short captions
  above Instagram's bottom UI band, exports H.264/AAC. Use when the user mentions
  a reel, short, vertical video, captions, or cutting dead air.
allowed-tools: Bash(ffmpeg *) Bash(ffprobe *) Bash(python3 *)
---

# Reels editor

You cannot watch video. You work from a transcript and still frames. Say so if
the user asks for a judgement that needs motion (pacing of a dance, a visual gag).

## Rules
1. Never modify source files. Write everything to ./edit/.
2. Probe every input with ffprobe. Report duration, resolution, fps, audio.
   If the source is under 1080 px tall, warn that a 9:16 crop will be upscaled.
3. Transcribe with word timestamps (faster-whisper small.en, or the engine the
   user names). Save transcript.json and transcript.md with [start-end] per
   phrase. Show me transcript.md and wait for corrections before captioning.
4. Propose the edit as a list of keep ranges with one-line reasons
   (cut retakes, ums, dead air). Wait for my OK before rendering.
5. Silence: silencedetect noise=-35dB:d=0.6, keep 0.15 s either side.
6. Reframe: crop=ih*9/16:ih centred unless I say where the subject is.
   Then scale=1080:1920.
7. Captions: write an ASS file with PlayResX 1080 and PlayResY 1920.
   At most 3 words per card, never across a full stop or comma, uppercase,
   white with a black outline. Text must stay between y=269 and y=1248
   (MarginV 700 or more) and 65 px from each side.
8. Export: libx264 high, CRF 20, yuv420p, 30 fps, AAC 48 kHz,
   -movflags +faststart, 1080x1920.
9. Verify before showing me anything: render a contact sheet
   (fps=1/2, tile=5x2) and one frame with the safe zones drawn in.
   Look at both. Fix caption collisions and bad cuts, then re-render.
10. Keep Reels under 3 minutes unless I ask; Instagram won't recommend
    longer ones to new audiences.
Two lines in there do most of the work. Rule 4 stops Claude cutting a sentence you wanted. Rule 9 is the closest Claude gets to watching its own edit.
The allowed-tools line lets Claude run ffmpeg and Python without asking each time. That's convenient, and it also means a bad command runs without a prompt, which is why rule 1 keeps your originals out of reach. Drop that line if you'd rather approve every step.
Copy-paste prompts for Claude Code
Run these from the folder that holds your footage. They work with the skill above, with ffmpeg-skill or video-use, or with no skill at all (Claude just has to work harder).
Start every project with an inventory, not an edit:
Look at every video in this folder. For each one, tell me the length, resolution,
fps and whether there's speech. Don't edit anything yet.
The everyday Reel:
Turn talk.mp4 into a 9:16 Instagram Reel under 60 seconds. Cut silences and ums,
keep my best take of any repeated line, add 3-word captions above the bottom 35%
of the frame. Show me the transcript and your keep list before rendering.
Pull several Reels out of one long video:
Transcribe podcast.mp4. Find the 5 strongest standalone moments of 20 to 45
seconds: each should make sense without context and open with a strong line.
List them with timestamps and the first sentence of each. Wait for me to pick.
Fix the hook:
The first 3 seconds are me saying hi. Find the most surprising sentence in the
transcript and move it to the start as a cold open, then cut back to the
beginning. Add that sentence as a big caption on the first frame.
Plan b-roll from the transcript:
Read the transcript and mark every sentence where a cutaway would help.
For each, suggest one b-roll shot I could film or find, with timestamps.
Don't insert anything yet.
Check before you post:
Make a contact sheet of reel.mp4 and a frame with Meta's Reels safe zones drawn
in (14% top, 35% bottom, 6% sides). Tell me anything that sits inside them,
any caption longer than 3 words, and any cut that lands mid-word.
Batch a week of posts:
Apply the reels-editor skill to every .mov in ./raw. Same caption style for all.
Put the results in ./edit with the original file names, then give me a table
of input length, output length and seconds removed.
Translate the captions:
Make a second version of reel.mp4 with Spanish captions. Translate from the
transcript, keep the same timing, and show me the translation before burning.
Mistakes that quietly ruin a Claude edit
- Asking Claude to judge visuals it hasn't seen. "Cut to the best-looking shot" means nothing unless it has frames to compare. Ask it to extract frames first.
- Trusting the transcript. Whisper heard "nine by sixteen" as "9x16" for us; names and brand terms go wrong more often. Read it before captions burn in.
- Captions in the bottom third. Anything below row 1,248 of a 1080×1920 frame competes with Instagram's own caption and buttons.
- Centre-cropping wide footage. You keep under a third of a 16:9 frame. Say where the subject is, or film vertical.
- Platform presets you never opened. A 90-second cap or a 20% margin can hide in a skill's settings file. Ask Claude to print the preset before it exports.
- Music you don't have rights to. Burning a track into the file is easy for Claude and risky for you. Add licensed music in Instagram's editor instead.
- Letting it overwrite the originals. Make "never touch the source files" the first rule of any skill.
Most of these share one fix. Make Claude show you its plan, and a picture of its result, before the final render.
More things to hand Claude once the basics work
- Cut one long recording into a week of Reels, each with its own hook card made with the Remotion skills.
- Write the Instagram caption, three hook options and the cover text from the transcript, so the post matches the video.
- Pick a cover frame: ask for the 6 sharpest frames where you're mid-sentence with your eyes open, then choose one. Instagram's recommended cover is 420×654, and you can't change it after posting.
- Rough-cut with auto-editor or Claude, then export a Resolve or Premiere timeline and do the final polish by hand.
- Keep a
project.mdof your caption style, fonts and rules, the way video-use does, so next week's edit matches this week's.
Rather not appear on camera? Our AI avatar generator comparison covers talking presenters. Our Kling b-roll prompts fill the cutaways Claude marks for you.
For background tracks you can actually post, see the best AI music generators. And if you're choosing a model for the edits, Fable 5.1 vs Opus 5 compares them.
Which setup should you pick?
If you film yourself talking and don't mind a cloud transcription bill, install video-use. It's the most complete, and it asks before it cuts.
If you want everything on your own machine, or you're editing client footage you'd rather not upload, install ffmpeg-skill. Then change two settings before your first Reel: move the captions above the bottom 35% and allow longer exports. Or use the SKILL.md above, which already does both.
If you live in Resolve or Premiere, skip the skills. Add the MCP server for your editor, let Claude do the rough cut and the captions, and keep the creative decisions for yourself.
And if you only want animated explainers from slides or data, and your company is on Team or Enterprise, try Claude Motion first. It's the one route here that doesn't need a terminal at all.